Following the decommissioning of the Payconiq brand in Belgium, these URL changes are essential to ensure compliance and mark the final phase in aligning our branding with the new Bancontact Pro identity.
Please implement adaptations described here promptly to avoid service interruptions and guarantee the continued acceptance of mobile payments via Bancontact Pay and Wero.
Changes are already available in our pre-production environement and will be rolled out in production starting 11/05/2026
Static QR Code allows you to add a printed static QR code to your point of sale (PoS) and link it to your cash register system. Your PoS sends the payment information to the QR code, your consumers scan the QR code with their preferred payment application and confirm the transaction.
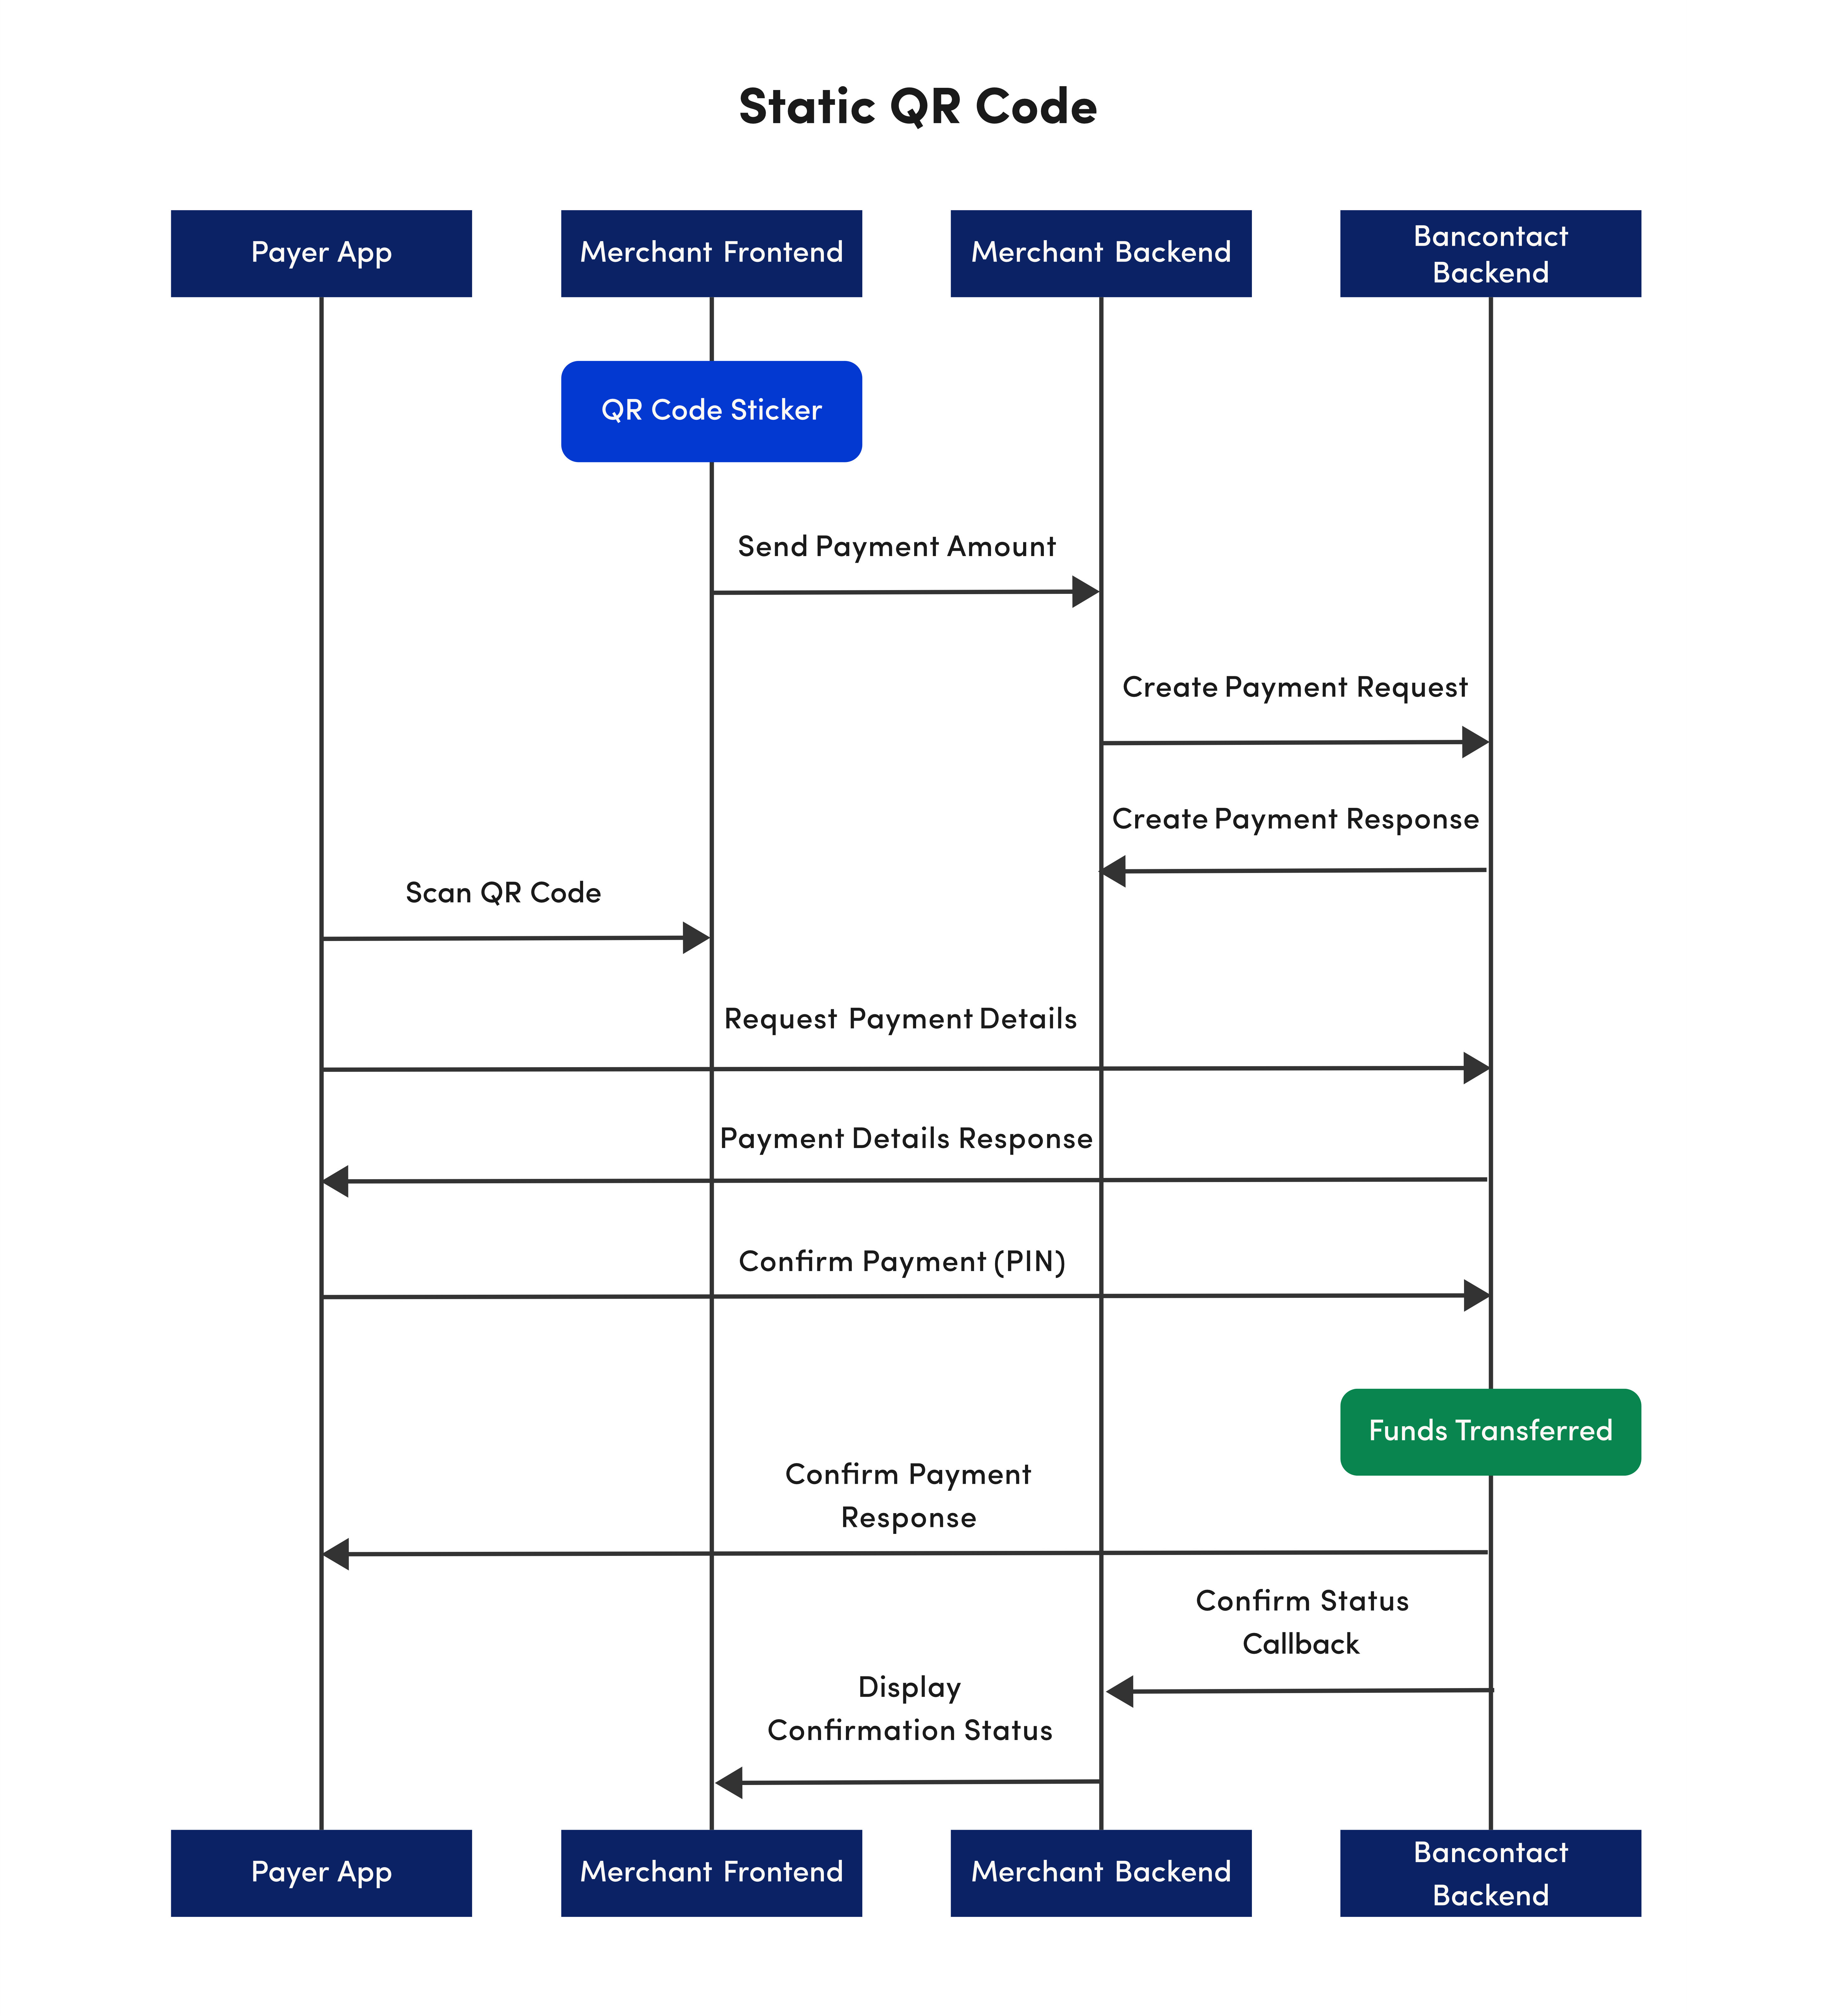
The following section outlines the key steps involved in a Static QR Code payment with Bancontact Pro API. The process involves several key parties, each playing a specific role in completing the transaction.
- API Key – This is used to secure the request between the Merchant’s backend and Bancontact Pro’s backend. Do not share your API keys in public areas such as online sites or client-side code.
- Merchant CallbackUrl (Optional) – This URL will be called by Bancontact Pro’s backend servers in order to send the status of the payment to the merchant.
The following parties participate in a display-based in-store payment with Bancontact :
- Payer Application: The consumer's preferred payment app used to complete the transaction.
- Merchant Frontend: The printed static QR code
- Merchant Backend: The merchant’s server-side system that integrates with Bancontact .
- Bancontact Backend: The backend system responsible for handling payment processing and integration services.
This section outlines a typical “Static QR Code” in-store payment flow using Bancontact . The process begins when the transaction is initiated at the merchant’s location and ends when both the merchant and the consumer receive the final confirmation.
- The Merchant frontend displays a Static QR code, visible to the consumers.
- The Merchant backend issues a REST request to the Bancontact backend to create the payment, providing parameters like amount, currency, description, and other relevant parameters.
- The Bancontact backend responds with the created payment ID and other relevant detail to the Merchant backend
- The Payer app scans the QR code to initiate the payment process.
- The Payer app sends a request for payment details to the Bancontact backend. The POS ID present in the Static QR is matched with a POS ID on Bancontact backend.
- Bancontact backend sends the payment details tot he Payer App, which contains the name of the merchant and the amount to pay.
- The consumer confirms the payment n the Payer app using PIN, fingerprint, or face ID. The Payer app then submits the payment request to the Bancontact backend for authorization.
- A payment response is sent back by the Bancontact backend to the Payer App, indicating whether the payment was successful or failed.
- The Bancontact backend sends a payment notification with the payment status to the merchant backend via the configured callback URL.
- The merchant frontend displays the payment status.
Important Note: The order in which the merchant and consumer receive payment status notifications is not guaranteed. Network and connectivity differences may cause one party to receive the update before the other.
In the following diagrams you will find a visual overview of the process flows presented above:
For the full endpoint documentation, please refer to the Merchant Payment API.
In order to create a Static QR code you need to use the Bancontact service URL as illustrated below. Once created, you will be able to print the Static QR on the medium of your choice.
The QR code contains the following parameters:
| Attribute | Description |
|---|---|
f [String :: Enum] Allowed Values: SVG, PNG | Image format. If not provided, the default format is PNG. |
s [String :: Enum] Allowed Values: S, M, L, XL | Image size of the QR code to generate. Small (S) = 180x180 Medium (M) = 250x250 Large (L) = 400x400 Extra Large (XL) = 800x800 The sizes only applies to PNG format. *If not provided, the default size is Small. |
c [String, required] | The UTF-8 URL encoded content. This is comprised of the location URL scheme. |
| Activity | Comment |
|---|---|
| 1. Obtain the pre-requisite information |
• Format of the QR code. • Size of the QR code. • Location URL scheme. • Payment profile ID of the merchant. • POS ID. |
| 2. Build the service URL |
Sample format:https://qrcodegenerator.api.bancontact.net/qrcode?f={imageFormat}&s={ImageSize}&c=Example Output URL (PNG): https://qrcodegenerator.api.bancontact.net/qrcode?f=PNG&s=L&c=Sample URL (SVG): https://qrcodegenerator.api.bancontact.net/qrcode?f=SVG&c= |
| 3. UTF-8 encoded URL parameters |
Encode the following using UTF-8: • POS ID Unencoded POS ID: POS00001Encoded POS ID: POS00001 |
| 4. Build the URL payload |
Format:https://payconiq.com/l/1/{PaymentProfileId}/{POSId}Example: https://payconiq.com/l/1/5bb37284e35e2b29e363df22/POS00001 |
| 5. UTF-8 encode the URL payload |
Before Encoding:https://payconiq.com/l/1/5bb37284e35e2b29e363df22/POS00001After Encoding: https%3A%2F%2Fpayconiq.com%2Fl%2F1%2F5bb37284e35e2b29e363df22%2FPOS00001 |
| 6. Combine service URL and encoded payload |
Full URL:https://qrcodegenerator.api.bancontact.net/qrcode?f=PNG&s=XL&c=https%3A%2F%2Fpayconiq.com%2Fl%2F1%2F5bb37284e35e2b29e363df22%2FPOS00001 |
You can now execute the URL in a web view to obtain your Static QR Code and print it on the medium of your choice.
In order to initiate a payment, you will first have to create it through Bancontact via a POST request. Each request will result in a unique payment identifier which will be valid for two minutes (120 seconds).
If the payment does not take place within these two minutes, a new payment must be created.
Partner payment reference, used to reference the Bancontact Company payment in the partner's system
Field used to reference a bulk batch, so the merchant can inform how the payments should be bulked. If it's not set here it will default to the one configured in the profile.
Amount in cents requested
Description of the payment that will be shown to the debtor, also used in the bank statement for reconciliation purposes. The characters used must comply with the SEPA Requirements for an Extended Character Set (UNICODE Subset) - Best Practices | European Payments Council.
Merchant's point of sale identifier
Id of the shop, where payment is created
Name of the shop, where payment is created. This name will be shown to the user during payment, but will be truncated in the remittance info, if longer than 23 characters.
Callback url to which merchants will be notified about the payment identification. If it's not set here it will default to the one configured in the profile
Callback url to which the merchant will be notified about the payment payout/cancel. If it's not set here it will default to the one set in the profile
List of Value Added Services (vouchers) eligible amounts within the payment
Payment ID
the status of the payment created
the creation time of the payment
the time from which the payment will be expired
Description of the payment that will be shown to the debtor, also used in the bank statement for reconciliation purposes. The characters used must comply with the SEPA Requirements for an Extended Character Set (UNICODE Subset) - Best Practices | European Payments Council. Only first 35 characters will be used for the remittance info
Merchant payment reference, used to reference the Bancontact Company payment in the merchant's system. The characters used must comply with the SEPA Requirements for an Extended Character Set (UNICODE Subset) - Best Practices | European Payments Council.
Amount in cents requested
Currency code. Only EUR is supported ISO 4217
Creditor account set to receive the payment
The configuration ID of the Merchant
the Id of the merchant
Merchant's company name that will be shown to the debtor
Creditor's Bank Account Iban to where the money will be sent to for this current payment
callbackUrl to which the merchant will be notified about the payment identification
callbackUrl to which the merchant will be notified about the payment payout
Provides information to navigate to our REST interfaces dynamically, by including hypermedia links to them. Note that for some links inclusion depends on the status of the payment (e.g. cancel link will be available on PENDING and refund on SUCCEEDED)
| HTTP Status | Code | Meaning |
|---|---|---|
| 400 | BODY_MISSING | A json needs to be provided |
| 400 | FIELD_IS_REQUIRED | Field X is mandatory |
| 400 | FIELD_IS_INVALID | Field X is invalid |
| 401 | UNAUTHORIZED | user doesn’t have an access token |
| 403 | ACCESS_DENIED | The JWT could not be verified (different format) - The JWT doesn’t contain the required authority to access the resource requested |
| 404 | MERCHANT_PROFILE_NOT_FOUND | The merchant profile does not exist |
| 422 | UNABLE_TO_PAY_CREDITOR | Variable reason(Depends on automatic processing). |
| 500 | TECHNICAL_ERROR | Technical error in Payment service |
| 503 | TRY_AGAIN_LATER | one of the internal services is unavailable |
- PREPROD merchant APIhttps://merchant.api.preprod.bancontact.net/v3/payments/pos
- PROD merchant APIhttps://merchant.api.bancontact.net/v3/payments/pos
- curl
- JavaScript
- Node.js
- Python
- Java
- C#
- PHP
- Go
- Ruby
- R
- Payload
curl -i -X POST \
  https://merchant.api.preprod.bancontact.net/v3/payments/pos \
  -H 'Authorization: YOUR_API_KEY_HERE' \
  -H 'Content-Type: application/json' \
  -d '{
    "reference": "19848995",
    "bulkId": "Bulk-1-200",
    "amount": 1,
    "currency": "EUR",
    "description": "string",
    "posId": "POS00001",
    "shopId": "3418e946-ef71-41ef-ad56-c41421c1e079",
    "shopName": "Bun café",
    "identifyCallbackUrl": "https://api.merchant.bancontact.net/identify",
    "callbackUrl": "https://api.merchant.bancontact.net/payment",
    "voucherEligibility": [
      {
        "voucherSchemes": [
          "BEL_MEAL_VOUCHER"
        ],
        "amount": 1013
      }
    ]
}'You can specify a callback URL where the Bancontact backend will send notifications about the status of a payment. This will allow you to take appropriate action and process the payment data.
The merchant backend must verify that the notification message originated from Bancontact backend was not altered or corrupted during the tranmission. To do so, please ensure signature validation.
For the full Callback documentation, please refer to the Callback Guide.
Bancontact Company Payment ID
Only EUR is supported currently
Requested amount in cents
Description of the payment that will be shown to the debtor, also used in the bank statement for reconciliation purposes. The characters used must comply with the SEPA Requirements for an Extended Character Set (UNICODE Subset) - Best Practices | European Payments Council.
Merchant payment reference, used to reference the Bancontact Company payment in the merchant’s system. The characters used must comply with the SEPA Requirements for an Extended Character Set (UNICODE Subset) - Best Practices | European Payments Council.
When the payment was created
When the payment is going to expire. After that date the payment can't be confirmed anymore
if the payment is SUCCEEDED, then this field represents the date-time on which the payment was SUCCEEDED
| Status | Description |
|---|---|
| PENDING | The merchant has created the payment and and is pending to proceed with identify step. |
| IDENTIFIED | The user has scanned the payment's QR code with the Bancontact Pay. |
| AUTHORIZED | The user has confirmed the payment and the bank authorized it. |
| AUTHORIZATION_FAILED | The authorization with the bank failed. |
| FAILED | Something went wrong during the payment process(e.g authorization failed). |
| SUCCEEDED | The payment has succeeded. |
| CANCELLED | When the payment has been canceled after the user has scanned it, or the merchant has cancelled the payment. |
| EXPIRED | The payment has expired. |
| PENDING_MERCHANT_ACKNOWLEDGEMENT | The payment is waiting for the merchant to acknowledge. |
| VOIDED | The payment has been voided |
Customer that paid
Debtor's IBAN masked
Debtor's first name
(No defined response schema)
- PREPROD merchant APIhttps://merchant.api.preprod.bancontact.net/callback
- PROD merchant APIhttps://merchant.api.bancontact.net/callback
- curl
- JavaScript
- Node.js
- Python
- Java
- C#
- PHP
- Go
- Ruby
- R
- Payload
curl -i -X POST \
  https://merchant.api.preprod.bancontact.net/callback \
  -H 'Content-Type: application/json' \
  -H 'Signature: YOUR_API_KEY_HERE' \
  -H 'User-Agent: Payconiq' \
  -d '{
    "paymentId": "5f91483d-78a7-4914-bc6f=",
    "currency": "EUR",
    "amount": 0,
    "description": "string",
    "reference": "19848995",
    "createdAt": "2019-08-24T14:15:22Z",
    "expireAt": "2019-08-24T14:15:22Z",
    "succeededAt": "2019-08-24T14:15:22Z",
    "status": "PENDING",
    "debtor": {
      "iban": "*************12636",
      "name": "John"
    }
}'In the event you do not receive a callback or the callback validation fails, please refer to "Get Payment Details". This alternative will also allow you to confirm the status of a transaction in order to complete the payment.
By calling this endpoint you can obtain the details of an existing payment transaction by passing the unique payment ID.
Note: it is highly recommended to implement this call as a fallback option if callback fails.
id(string, required)
id of the payment
the creation time of the payment
the time from which the payment will be expired
if the payment is SUCCEEDED, then this field represents the date-time on which the payment was SUCCEEDED
Currency code. Only EUR is supported ISO 4217
| Status | Description |
|---|---|
| PENDING | The merchant has created the payment and and is pending to proceed with identify step. |
| IDENTIFIED | The user has scanned the payment's QR code with the Bancontact Pay. |
| AUTHORIZED | The user has confirmed the payment and the bank authorized it. |
| AUTHORIZATION_FAILED | The authorization with the bank failed. |
| FAILED | Something went wrong during the payment process(e.g authorization failed). |
| SUCCEEDED | The payment has succeeded. |
| CANCELLED | When the payment has been canceled after the user has scanned it, or the merchant has cancelled the payment. |
| EXPIRED | The payment has expired. |
| PENDING_MERCHANT_ACKNOWLEDGEMENT | The payment is waiting for the merchant to acknowledge. |
| VOIDED | The payment has been voided |
Creditor account set to receive the payment
The configuration ID of the Merchant
the Id of the merchant
Merchant's company name that will be shown to the debtor
Creditor's Bank Account Iban to where the money will be sent to for this current payment
callbackUrl to which the merchant will be notified about the payment identification
callbackUrl to which the merchant will be notified about the payment payout
Amount in cents originally requested. If no amount was requested by creditor, this will be 0
merchant's description of the payment
debtor's message of the payment
Merchant payment reference, used to reference the Bancontact Company payment. The characters used must comply with the SEPA Requirements for an Extended Character Set (UNICODE Subset) - Best Practices | European Payments Council. in the merchant's system
Field used to reference a bulk batch, so the merchant can choose how to bulk the payments. Mandatory if merchant profile does have bulking enabled, otherwise will miss from the response. If it's not set in the create call it will default to the value configured in the profile if it exists, otherwise its value will be defaulted by the application.
Provides information to navigate to our REST interfaces dynamically, by including hypermedia links to them. Note that for some links inclusion depends on the status of the payment (e.g. cancel link will be available on PENDING and refund on SUCCEEDED)
| HTTP Status | Code | Meaning |
|---|---|---|
| 401 | UNAUTHORIZED | caller doesn’t have an api-key access token |
| 403 | ACCESS_DENIED | api-key access token is invalid, creditor is not a participant of the requested payment |
| 404 | PAYMENT_NOT_FOUND | no payment could be found |
| 500 | TECHNICAL_ERROR | Technical error in Payment service |
- PREPROD merchant APIhttps://merchant.api.preprod.bancontact.net/v3/payments/{id}
- PROD merchant APIhttps://merchant.api.bancontact.net/v3/payments/{id}
- curl
- JavaScript
- Node.js
- Python
- Java
- C#
- PHP
- Go
- Ruby
- R
- Payload
curl -i -X GET \
  'https://merchant.api.preprod.bancontact.net/v3/payments/{id}' \
-H 'Authorization: YOUR_API_KEY_HERE'You can also retrieve a list of payments by specifying how many records to return, as well as a filter on the results for the total number of records returned per page.
default is today - 1day (yesterday)
Merchant payment reference, used to reference Bancontact Company payment in merchant system. The characters used must comply with the SEPA Requirements for an Extended Character Set (UNICODE Subset) - Best Practices | European Payments Council.
Size of the elements returned in current page
Total number of pages in the backend for the list requested
Total number of elements in the list requested
Current page number
| HTTP Status | Code | Meaning |
|---|---|---|
| 401 | UNAUTHORIZED | caller doesn’t have an api-key access token |
| 403 | ACCESS_DENIED | api-key access token is invalid, creditor it's not a participant of the requested payment |
| 500 | TECHNICAL_ERROR | Technical error in Payment service |
- PREPROD merchant APIhttps://merchant.api.preprod.bancontact.net/v3/payments/search
- PROD merchant APIhttps://merchant.api.bancontact.net/v3/payments/search
- curl
- JavaScript
- Node.js
- Python
- Java
- C#
- PHP
- Go
- Ruby
- R
- Payload
curl -i -X POST \
  'https://merchant.api.preprod.bancontact.net/v3/payments/search?page=0&size=10' \
  -H 'Authorization: YOUR_API_KEY_HERE' \
  -H 'Content-Type: application/json' \
  -d '{
    "from": "2019-08-24T14:15:22Z",
    "to": "2019-08-24T14:15:22Z",
    "paymentStatuses": [
      "PENDING"
    ],
    "reference": "19848995"
}'Endpoint delete-payment can be used to cancel a created payment that is still in status PENDING. The endpoint can also be used to cancel a payment in IDENTIFIED status, as long as the consumer has not initiated payment confirmation.
id(string, required) — Payment Id
| HTTP Status | Code | Meaning |
|---|---|---|
| 401 | UNAUTHORIZED | user doesn't have an access token |
| 403 | ACCESS_DENIED | access token is invalid |
| 403 | CALLER_NOT_ALLOWED_TO_CANCEL | if caller is not a participant of the payment |
| 404 | PAYMENT_NOT_FOUND | payment is not found in the system |
| 422 | PAYMENT_NOT_PENDING | payment is not in pending or identify state |
| 500 | TECHNICAL_ERROR | Technical error in Payment service |
- PREPROD merchant APIhttps://merchant.api.preprod.bancontact.net/v3/payments/{id}
- PROD merchant APIhttps://merchant.api.bancontact.net/v3/payments/{id}
- curl
- JavaScript
- Node.js
- Python
- Java
- C#
- PHP
- Go
- Ruby
- R
- Payload
curl -i -X DELETE \
  'https://merchant.api.preprod.bancontact.net/v3/payments/{id}' \
  -H 'Authorization: YOUR_API_KEY_HERE'